"You never really understand a person until you consider things from his point of view-until you climb inside of his skin and walk around in it." -Atticus Finch
In my English class, we read the book To Kill a Mockingbird by Harper Lee. I was quite surprised that Funko hasn't made any figures of the characters yet. So I decided for my creative element part of my final project was to make FunkoPop figures of some of the characters. Since I have made Funko Pop figures before, I found making them easy to do. They took me three weeks to make.This post will show how I made them!The characters I did was Atticus Finch and his daughter Jean Louise "Scout" Finch. I also wanted to do Jem Finch but I knew that I like to spend a lot of hours on just one figure so I just kept it to the two.
The pops I used for my bases are David Levinson from Independence Day for Atticus and Deb from Napoleon Dynamite for Scout. I was able to get both pops from one of my EB Games for $7 each.
Here are the materials I used to make them:
-Das Air-Dry Clay - acrylic paints
-Sandpaper - Modge Podge
- tacky glue -paintbrushes
-foam sheet -crafting knife
-masking tape -hot glue gun
-toothpicks
I first started planning out what they would look like.
Sculpting Process:
Atticus:I choose David Levinson because his hair and glasses reminded me of the Gregory Peck Atticus from the movie and I could easily change his clothes into a blazer, vest, and tie.
First, I took the head off the pop to make sculpting his clothes more easier. I put him in a cup of boiling water for two minutes. When a pop figure is boiled in hot water, the vinyl becomes soft and the glue that attatched the head to the body starts to come off. So I pulled the head off the neck peg while it was still soft.
Then I started sculpting clay onto the body. I sculpted on longer sleeves, shoe details,pockets, lapel, vest, a tie and the flaps to his button down shirt. I decided to keep the papers the figure was holding to make it look like Atticus is holding court papers. For his head, I added a bit of clay to one side of his head to make it look like it had some volume. Sadly I don't have a picture of it alone but I have some pics with my Scout progress.
Scout:
 I choose Deb because she looked like a simple base figure to use. I didn't need her ponytail so I first removed that by yanking it off. If you ever plan to make one and you can't yank the ponytail off, I recommend boiling the head in hot water and then pulling it off because the ponytail is glued on.
I boiled the whole figure in hot water for a couple minutes to remove the head. When a pop is soft, you can move it's arms and legs around and when it hardens, the position stays. I wanted to have Scout holding a box of things from the Boo Radley tree so when the vinyl was soft, I positioned her arms to be right by the fanny pack.
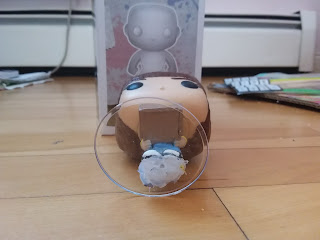
Since Scout is a child and pops of child characters are hard to find to customize, I decided to cut a bit of her legs off. I wanted to make her shorter than Atticus and Deb also had some standing difficulties. My Deb had tiny feet and she couldn't stand on her own and also the figure's feet were messed up. Most pops with tiny feet comes with a clear stand but her hole that you put the peg in was drilled in too small. So that was a happy accident!!
While the vinyl was still soft, I got out a crafting knife and cut off her feet and a bit of her legs. I had to move her legs around to help loosen them and cut deep to them off. If you plan to do this, be careful when using a knife. I accidentally cut into my left nail while doing this. Ouch! It hurt for a week.
For the hole where the ponytail used to be, I filled it with clay.
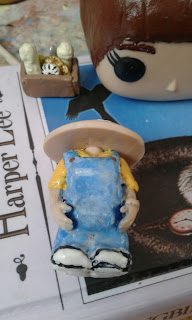
Then I used clay to create new feet and sculpted on her overalls.
I originally tried sculpting her box out of clay, but it was too small to put anything in it. So I used a foam sheet to create a small box.
Here she is with her hair sculpted on and the box glued. Since what her hair looked like (except the bangs) wasn't mentioned in the book, I based her hair a bit off of the one from the movie. After the clay dries on the top, I sand any bumps or imperfections.
I made little things from the Boo Radley tree. I made the two soap dolls, the watch with the knife and a pack of gum.
Here is Scout and Atticus' heads and bodies after they were sanded. Ready to paint!
Paint Process:
I created two videos of me doing some painting on both figures. Hopefully they will be uploaded on my YouTube channel soon.Here is Atticus. I used a light blue paint to do his suit. I also painted the clay on his hair black and later on added some grey in his hair. I also used masking tape to cover his face and glasses so I wouldn't get any black paint on his face or lenses. I wasn't planning to paint his glasses or face. You will see more pics when you scroll down more.
I also used masking tape to wrap Scout's face too to save me time from painting over her face. I used a brown red color for her hair and did about ten layers. I used multiple shades of blues to add an affect on her overalls. There's about 12 layers of blue that was painted onto her overalls. I painted her shirt a bright yellow. After I took off the tape, I used a toothpick and the paint to fill in the white parts of clay. Then I got out a dotting tool and a different brown paint to do her eyebrows. I also mixed a brown and gold paint to create her overall buttons. I also used an antique white and black paint to create her shoes.


I painted the box a light brown. The soap dolls are a light antique white mixed with a light yellow. It's a little hard on camera to see. The watch was done with a gold acrylic and light antique white. With black acrylic paint and a toothpick,I made the clock hands and the lines.
Here's the knife and gum package.
I also glued the knife onto the back of the watch and here are the Boo Radley items glazed.
Here is some pics of Atticus being finished. He was more easier to do than Scout and sadly I don't have a lot of pics from his process. In one of them there's glue around the peg. I glued the neck and body back on together.
And here's the Boo Radley items glued in the box.
I created a part on my box for her hands to hold and I used tacky glue and hold the box for it to stay. I'm actually impressed that I was able to do that with my Scout pop.
Here is the glue on the neck peg.
The body and head glued together:
Since the pop was too heavy to stay on the stand, I ended up hot gluing her onto it.
Here are the pops all done! Yay!
I also wanted to make a Jem but I knew I would spend more time on Scout and Atticus. Instead, I created a acrylic painting of Jem as a pop figure. I bought a small canvas board and used my acrylic paints to create the concept art pic of Jem,


Conclusion (for school):
I chose to do these because I've been making these kinds of figures for 2 years now and I knew I would put a lot of time and love into them. I started planning in early December and started sculpting them after Christmas. The figures are visual representations of the character from the book and were created to be in a form a brand of pop culture figures. The construction went better than I thought I would because cutting the legs off Scout was easier than I thought it would be. If I would have done it differently, I would have sanded Scout's feet more and worked more on getting the feet to fit onto the stand. I love these figures and I really like how I created Scout. These figures are one of my best works.
This is the end of my post. I hope you enjoyed watching my process of how I made Atticus and Scout!
Past works:


Cool and creative scupltures! I have some of these as well. Though I don't use them for my sculpture supply, just for collection. Great work nonetheless.
ReplyDeleteThose are absolutely great! I love them!... Are you going to do Jim and Boo Radley?
ReplyDelete